Managing multiple email accounts can be a hassle – unless you bring them all under one roof. If you are a GMX Mail user and want to organize your inbox using Microsoft Outlook, then this guide is for you. In just a few easy steps, you will be able to add/import GMX mail to Outlook. So, let’s see how to do it easily.
GMX Mail is a free and reliable email service from Germany’s United Internet. It offers 65 GB of storage, spam protection, and many other function for smart emailing. It is easily accessible via the web, mobile apps, as well as with most email clients. Additionally, you can also connect it to software like Outlook.
On the other hand, MS Outlook is a professional-grade email client from Microsoft. This application is being used by a large number of users to manage emails, calendars, tasks, and contacts.
It supports various email protocols including IMAP, POP3, and Microsoft Exchange. Outlook allows users to manage multiple email accounts in one place.
Also Read: – How to Export/Migrate Emails from GMX Mail to Gmail?
Why Add GMX Mail to Outlook?
- Unified Email Management: – Access and manage your GMX Mail account, as well as your other email accounts, from a single platform.
- Offline Email Access: – Get access to GMX email even when you’re offline with Outlook Offline Mode.
- Calendar & Task Integration: – Get the ability to manage calendar events and contacts with GMX Mail in Outlook for better scheduling and task management.
- GMX Email Data Backup: – Automatically create a local backup of your GMX emails in Outlook PST format.
Method 1: How to Add/Configure GMX Mail Account to Outlook?
Adding your GMX mail to Microsoft Outlook is a quick and easy process. Follow these steps to set it up:
Step 1: – Enable IMAP in GMX Mail
- Login to your GMX account.
- Go to Settings and find POP3 & IMAP section.
- Enable IMAP Access in your account.
Step 2: Configure GMX Mail in Microsoft Outlook
- Launch Microsoft Outlook on your computer.
- Click on File in the top-left corner.
- Select Add Account under Account Information.
- In the Add Account window, enter your GMX email address.
- Click Connect, and Choose IMAP as the account type from next screen.
- Enter the following IMAP and SMTP settings for GMX Mail:
- Incoming Mail (IMAP)
- Server: imap.gmx.com
- Port: 993
- Encryption: SSL/TLS
- Outgoing Mail (SMTP)
- Server: mail.gmx.com
- Port: 587
- Encryption: STARTTLS
- Incoming Mail (IMAP)
- When prompted, enter your GMX email password.
- Click Next to test the connection and verify that everything is correct.
- Once the test is successful, click Done/Finish.
Your GMX Mail account is now added to Outlook. All your emails, folders and contacts will now be accessible in Outlook.
Method 2: – Import GMX Emails to an Existing Outlook Profile
If you already use Outlook with an existing profile and want to import all your GMX emails into the same account, the most reliable way is to use eSoftTools IMAP Backup & Migration software.
This tool simplifies the whole process by exporting GMX emails directly into a format compatible with Outlook – no manual setup or risk of data loss.
Why Use This Method?
- No need to manually configure GMX account with IMAP settings in Outlook
- Supports import mail folders retaining full folder structure, attachments, and email properties.
- Ideal for users who want to merge GMX emails into an existing Outlook Profile
How to Add/Import GMX Mail to Outlook Using IMAP Migrator?
Follow these simple steps with IMAP Backup & Migration tool to transfer GMX emails directly –
- Download eSoftTools IMAP Backup & Migration software on Windows PC.
- Launch the software and select the IMAP server from the email programs list.
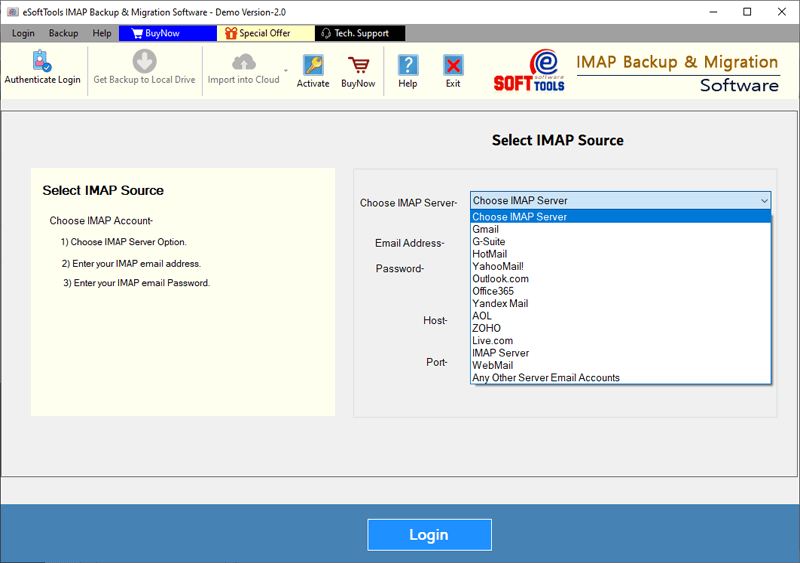
- Enter your GMX email account details: –
- Email Address: yourname@gmx.com
- Password: Enter your GMX account password
- IMAP Server: imap.gmx.com
- Port: 993

- Click Login to connect to GMX mail and fetch account’s mailbox folders.
- Once the software get the connection, it will show you list all your GMX folders (Inbox, Sent, Drafts, etc.)

- Select the folders you want to backup/export in Outlook profile.
- Choose the Save in PST from the list of export formats.

- Locate your destination path where you want to store PST files with GMX mail data.

- Use mail filter (optional) and click on Save Backup and download GMX emails to PST files.

The software will start transferring your chosen GMX emails to your existing Outlook profile. With this process you can create a backup of GMX email account profile data.
How to Import PST files in MS Outlook?
If you have GMX email backup in PST file (Outlook Data File), you can easily import it into Microsoft Outlook by following these simple steps: –
- Launch Outlook and open the profile in which you want to add GMX emails.
- Click on File in the top-left corner and select Open & Export >> Import/Export.
- In the Import and Export Wizard, choose- Import from another program or file and click on Next.
- Choose Outlook Data File (.pst) and hit on Next.
- Click Browse, and select the .pst file from your computer.
- Under Options, choose one:
- Replace duplicates with items imported
- Allow duplicates to be created
- Do not import duplicates
- Click Next and select folder(s) you want to import (Inbox, Sent Items, etc.).
- Apply other needed settings and click on Finish to begin the import.
Outlook will now load and display all the GMX emails, contacts, and calendars from the PST file.
Conclusion
You can easily access GMX mail in Outlook by configuring manually via IMAP or by using eSoftTools IMAP Backup and Migration tool. For smooth performance and data security, eSoftTools software method is highly recommended. Perfect for migration or backup directly to Outlook. So try it now.